Installing OS X Leopard on 1000H without USB stick or DVD drive
[Skip this post if you don’t know what the title means or you don’t care about it.]
So after many long nights of attempting to install OS X on my eeePC 1000H, I finally managed to install it 2 weeks ago. For future reference and also to help others who might be facing the same problems, I’ve decided to write down the steps I followed to get it done.
Disclaimer:
I take no credit for any of the steps listed below. I am simply gathering the information into one location. Also, I make no guarantees on the information listed here. Use it at your own risk! Note that you are breaking the OS X EULA by installing OS X on non-Apple hardware, therefore, I do not recommend you do so. The information here is for educational purposes only. If you are going to use OS X on your 1000H, at least buy a OS X license from Apple to support them.
All the steps are gathered from the following pages:
http://www.enik.ch/2008/10/osx-leopard-1055-on-the-eee-1000h/ (Link 1)
http://forums.msiwind.net/mac/making-osx-installer-usb-stick-with-mac-t5612.html (Link 2)
http://forums.msiwind.net/mac/how-install-osx-with-and-without-usb-stick-usb-dvd-t4701.html (Link 3)
http://www.insanelymac.com/forum/index.php?showtopic=110388 (Link 4)
The biggest issue I had with installing OS X was simply that I did not have an external DVD drive to boot the install disc from. I was not willing to spend close to a hundred bucks to buy the DVD drive when I will probably only use it once. After searching around for information about how to work around that, I found a tool called Leopard HD install helper that could dump the disc image onto a separate file partition and make it bootable.
Files required for installation:
– iDeneb 1.4 image file
– Leopard_hd_install_helper_v0.3.zip (download from Link 4. you have to register an account)
– miniboot.zip (download from Link 4)
– dd for windows (download from here)
Step 1: Format a PRIMARY FAT32 partition. I recommend using EASEUS Partition Manager, which is free and works well. <— We call this partition the Install Partition
Step 2: Create a PRIMARY partition for leopard install. We call this partition the Destination Partition

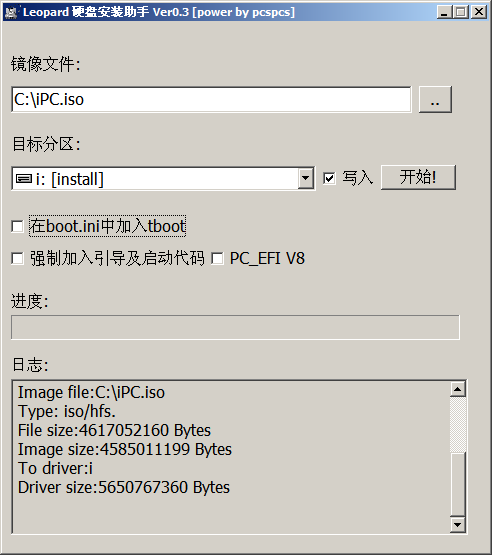
Step 3: Use Leopard HD Install helper dump miniboot.iso to Destination Partition.

Step 4: Use Leopard HD Install helper dump your 10.5.6 ISO to Install Partition.
Note: If you have trouble using the Leopard HD Install helper, look up Link 2 and Link 3 for help in troubleshooting.
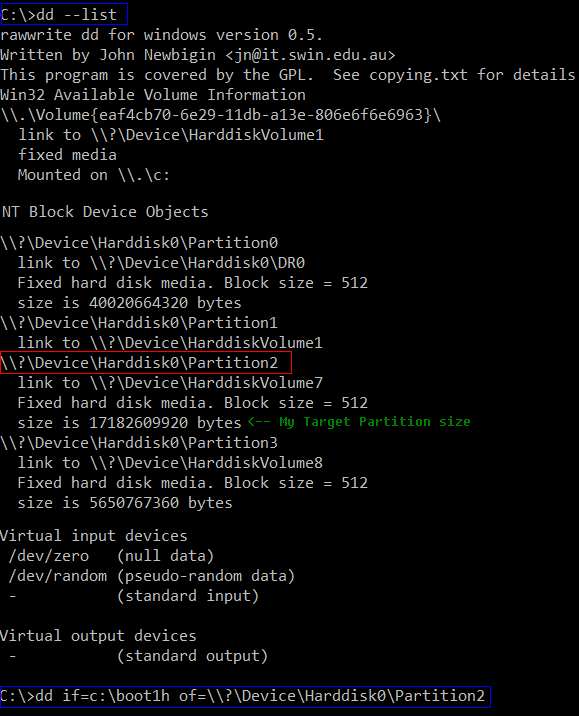
Step 5: Use dd for win write boot1h (extract from miniboot.zip) to Destination Partition. (refer to image below for the commands)
Step 6: Reboot and you can install leopard from your hard disk.
Follow the rest of the steps at Link 1 to complete your installation. The instructions are actually specifically for iDeneb 1.3 but I found that most of it works for iDeneb 1.4 too.
Update:
There is now updated instructions for installing iDeneb 1.4.
http://www.enik.ch/2009/03/osx-leopard-1056-on-the-eee-1000h/
The first 6 steps listed here for installing from hard drive are still the same.
Questions? Problems?
If you have any questions or encounter any problems during the install, please visit the Insanely Mac Forums, as there are many experts there who can help you.
I only dumped the osx.iso to hd without editing the boot1h and it works too.Just check all boxes in the download helper .
Thank you very very much!I nearly give up, cause I didn’t want to buy a external DVD-player just to test the possability to install OSX.With your guide, I finally manage to boot into Ideneb.
this is really frustrating….the mac forums links that you provided to the files we need to download are blocked..as in, I registered and new users cannot download attachments or reply to posts…can you upload the files to rapidshare?
here, i found a link to download Leopard hd install helper-http://www.iphone.org.hk/attach/48221-Leopard_hd_install_helper_v0.3.zip
hey man! excellent tutorial!I'll try it as soon as I get my iDeneb iso. The only mistake I've seen is the images of step 3 and 4 inverted.Thanks for posting! It was really helpful.
excellent guide.I hit only one quirk. When being in the OSX installer and trying to erase/format the destination volume it would throw an error when selecting MAC OSX extended.I had first to erase/format with fat only then it would offer "MAC OSX extended (journaled)" which I then used to format a second time.
does this method work using windows 7 ultimate? thanks
it’s not been tested with windows 7 before but you could try.
i tried this but no luck. not able to boot. and also my windows 7 wouldn’t boot anymore.
anyhow, i tried another method from:
http://osx.mechdrew.com/guides/nbi2.shtml#installation
but instead of using OSX retail, used iDeneb 10.5.6.
and since i only have 1 usb drive, i used an external hdd.
first i downloaded, NBI_083F dd Image and Image Writer for Windows from:
http://osx.mechdrew.com/downloads/NBI_083F.img
http://launchpad.net/win32-image-writer/0.2/0.2/+download/win32diskimager-RELEASE-0.2-r23-win32.zip
1. Unzip Image Writer to any folder on your computer. (Make sure to extract all the files in the ZIP file.)
2. Open the Image Writer program (it’s called Win32DiskImager in the folder you extracted).
3. I USED THE USB drive first. Select the correct drive letter under Device, select the NBI_083F image under Image File, press Write and then Yes. The Progress indicator will help you know when it is finished
now for the iDeneb ISO, i used the Leopard_hd_install_helper_v0.3.zip to load the ISO to my external HDD.
with the USB drive and External HDD still attached to my eeepc 904ha, i rebooted and booted from USB drive.
the gray screen appeared, with choices, win7 and iDeneb, chose iDeneb and then after a few seconds, the panic screen appeared.
take note, i also flashed my bios as instructed.
i tried iDeneb 10.5.5 and 10.5.6 same results.
help please.
thanks
P.S. sorry if my post is a mess. im new to this stuff. 😀